My daughter is obsessed with deli dills, so I might as well try to make them at home for her. This recipe came from the book "Ball Complete Book of Preserving" edited by Judi Kingry & Lauren Devine. (My new canning bible!)
Sorry, no pictures, but I will add them when I get a chance.
A friend of mine asked me to post the recipe for dills that I have been making this summer. I have not completed a batch of these as of yet (Aug 1, 2013) but, I'm excited about these, and so far... they seem to be working.
These are whole pickles. If I have a cucumber bigger than 4 inches (the height of my pint jar) and bigger 1 1/2 inches thick, I cut to fit, and quarter it lengthwise to fit. I'm 1 week into my first batch, and taste tested. Not there yet, but I have high hopes for tasty dills later. My daughter is obsessed with deli dills, so I might as well try to make them at home for her.
Here's the recipe...
Deli Dills
3/4 c. pickling spice, divided (1/2 c. & 1/4 c.)
2-3 bunches of dill or 3-4 TBSP of dill seed
10 lbs. of pickling cucumbers (4 inches long, blossom end trimmed off)
1 1/2 c. pickling salt
2 c. white vinegar
32 c. water
6 cloves garlic (optional)
Stage 1:
1) In large clean crock, glass, or stainless steel container, place 1/2 c. pickling spice and 1 bunch of dill. (2 TBSP) Add trimmed cucumbers, leaving at least 4 inches of space between cukes & rim of container. Set aside.
2) In large stainless steel pot, combine pickling salt, vinegar, & water. Bring to a boil over med.-high heat, stirring to dissolve salt. Remove from heat & let cool to room temp.
3) Ladle pickling liquid over cukes to cover. Add remaining dill & spice over the top. Add garlic, if using. Place a large clean inverted plate weighted down. Cover with a clean heavy towel. Let stand in cool plate (70 to 75 degrees) for about 3 weeks--until cucumbers are flavored with dill & clear throughout. Everyday, remove any scum that has formed. During fermentation, gas bubbles will form. When bubbling ceases, fermentation is complete.
Stage 2:
1) Prepare canner, jars & lids.
2) Drain pickles, reserving brine. Set pickles aside. Strain brine into a large stainless steel pot. Bring to boil over med.-high heat. Reduce heat & boil gently for 5 min.
3) Pack pickles into hot jars to within a generous 1/2 inch headspace. ladle hot pickling liquid into jar to cover pickles leaving 1/2" headspace. Remove air bubbles & adjust headspace, if necessary, by adding hot liquid. Wipe rim. Center lid on jar. Screw band down until resistance is met, then increase to fingertip-tight.
4) Place jars in canner, ensuring they are completely covered with water. Bring to a boil and process for 15 min. Remove canner lid, wait 5 min. then remove jars. cool, then store.
Thursday, August 1, 2013
Wednesday, November 14, 2012
Wallpaper Dillema
I'm sure I have mentioned this before, but we're still working on the kitchen. We have the back splash and counter tops attached and the shelves above the sink hung. Now, it's time to think about wallpaper. Now, the paper that is currently there isn't bad, but it is a bit dated, and curling up at the edges. I tried pulling it off the wall, but quickly found that the previous owners papered directly onto the drywall. (sigh) What a royal mess that is going to be to remove without having to replace all the drywall!

So after some "pinning", and thinking, I decided on my final options. RECIPES! Many years ago, my mom, sister and I wallpapered a wall in my brother's room with comic pages. Glue on the wall, smooth out the comic, then another layer of watered down glue on top of that. Why can't I do the same with recipes?
So, now I'm on the hunt for handwritten recipes from friends and family members. Just this wall is getting the treatment, but there is a lot of space that needs to be covered. I can't tell you how excited I am! Don't worry, pictures will come as the project gets underway!! In the meantime, send me your favorite recipe, handwritten of course.
Monday, October 29, 2012
countertops!
Oh the joys of having new counter tops. After many months of mixing, pouring, and grinding, we finally have the sink counters done. This book... was our inspiration for getting the work done. A debt of gratitude to Mr. Cheng for guiding us along on this journey.
 The tops were done in 3 pieces. Aaron is cleaning up the spillage from the 2 smaller parts. One over the garbage, and one that goes along the back of the sink. We used Quikcrete 5000 for our base, and quikcrete dye (charcoal) for the color. We added 1 bottle of dye per bag of mix, mostly for the ease of measuring, to tet the dark color we were after.
 Once dry, we put them in place, just to make sure they would work. I used Cheng's sealer to make sure we wouldn't get any stains on them until we would be ready to grind them and put them permanently in place.
We knew we wanted our backsplash to be 18 inches high. We just weren't sure if we should do it in 3 pieces like the counter, or one big piece. I also wanted something with a little more character than a large piece of crete. I have a love of leaves. I have several wall hangings of just pressed leaves in a frame. Why not try to incorporate that in the backsplash somehow?
I walked around the farm gathering leaves from various trees. Ones that would make a great impression, and also ones that would be easy to identify. I found walnut tree fronds, oak & maple leaves and also some from our newly planted fruit trees. I put them in my press, and made sure they were nice and flat and dry.
Now, the fun. Aaron's brother, Eric came over and helped us with our decision. One large piece to put behind our sink. While the boys prepped the mold, I prepped the leaves. Some things we had to consider with the leaves were 1) how to release the leaf from the concrete and 2) how to keep the leaf stuck to the base of the mold, so it wouldn't float up into the concrete.
We tried spraying the leaf with clear acrylic spray. We had also used a spray adhesive to hold the leaf down in the mold.

 As you can see, the leaf released easily from the mold, but not so much from the concrete. But, look at that detail! The veins stand out so nicely!!

I tried ironing the leaves with waxed paper, but the wax wasn't transferring to the leaf like I wanted. Next, I tried petroleum jelly. I smeared the stuff on to the bottom side of the leaf and along the stem. A nice thin layer, of course, we didn't want to interfere with the vein details.
Now, the adhesive. I was going to use the same spray that we had used before, but, of course, the can was empty. (sigh) Also, it didn't do a very good job keeping the stem tacked down. Since we were putting silicone caulk along the edges and seams of the frame, we decided just to smear that on the opposite side of the leaf. Ahh... everything seems to be working.
I took the leaves out the barn where my husband and his brother were busy finishing up the mold. They had constructed a template out of luan (or 1/4 inch plywood) to make sure the holes for the electrical and pipes were all in perfect order. Everything in place, we waxed the MDF, laid down the selected leaves, and prayed that it would work.
We poured the concrete mix, and then waited. That's the hardest part of the whole process. (besides carrying it, that is.) When we finally got to unmold it, we were pleased with what we found. Not so much detail with veins, but still, a nice shape and I'm pleased.
 We managed to bring the HUGE block up the house, and also the other pieces from inside the house. Aaron spent the better part of his day spreading grout over the little bubbles and then grinding them off to get a nice smooth and shiny surface. I wish I would have gotten a picture of Aaron in his wet suit.
All done. We spread the concrete sealer over all 4 parts, and let it set. Aaron found his caulk gun, and time to install. The countertop pieces fit perfectly. Glued them down and got ready to get the back splash in. 160 pounds of crete was used, and it's approximately 6 feet long. I wished we could have convinced Eric to come back to help with this part.
 Things were a little tighter with the backsplash. The holes were all in perfect placement, but, the boys forgot to scribe their template to the wall. That made it a little tighter than we planned. Aaron did a little scraping and chipping of the drywall, and we got it to fit. At long last, and backsplash to be proud of.
All that is needed now, is the faucet back in place, the electrical fastened down, and all the seams caulked to keep water from leaking in between.
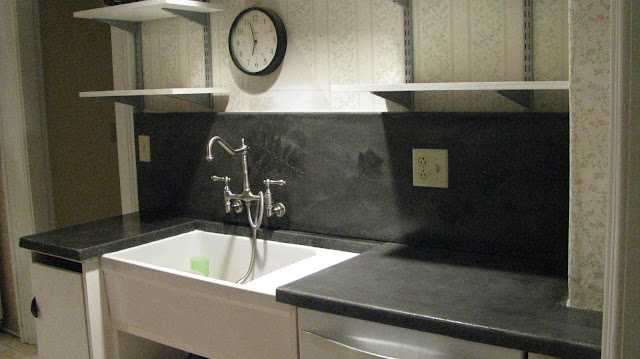 And here is the final picture. The leaf prints stand out and everything is smooth and shiny. It is waiting for a 2nd coat of sealer and wax. I couldn't be happier with the final product. The back splashes around the rest of the kitchen won't be as elaborate and only 6 inches tall. I don't think my back could take carrying this back in again.


We knew we wanted our backsplash to be 18 inches high. We just weren't sure if we should do it in 3 pieces like the counter, or one big piece. I also wanted something with a little more character than a large piece of crete. I have a love of leaves. I have several wall hangings of just pressed leaves in a frame. Why not try to incorporate that in the backsplash somehow?
I walked around the farm gathering leaves from various trees. Ones that would make a great impression, and also ones that would be easy to identify. I found walnut tree fronds, oak & maple leaves and also some from our newly planted fruit trees. I put them in my press, and made sure they were nice and flat and dry.
Now, the fun. Aaron's brother, Eric came over and helped us with our decision. One large piece to put behind our sink. While the boys prepped the mold, I prepped the leaves. Some things we had to consider with the leaves were 1) how to release the leaf from the concrete and 2) how to keep the leaf stuck to the base of the mold, so it wouldn't float up into the concrete.
We tried spraying the leaf with clear acrylic spray. We had also used a spray adhesive to hold the leaf down in the mold.

 As you can see, the leaf released easily from the mold, but not so much from the concrete. But, look at that detail! The veins stand out so nicely!!
I tried ironing the leaves with waxed paper, but the wax wasn't transferring to the leaf like I wanted. Next, I tried petroleum jelly. I smeared the stuff on to the bottom side of the leaf and along the stem. A nice thin layer, of course, we didn't want to interfere with the vein details.
Now, the adhesive. I was going to use the same spray that we had used before, but, of course, the can was empty. (sigh) Also, it didn't do a very good job keeping the stem tacked down. Since we were putting silicone caulk along the edges and seams of the frame, we decided just to smear that on the opposite side of the leaf. Ahh... everything seems to be working.
I took the leaves out the barn where my husband and his brother were busy finishing up the mold. They had constructed a template out of luan (or 1/4 inch plywood) to make sure the holes for the electrical and pipes were all in perfect order. Everything in place, we waxed the MDF, laid down the selected leaves, and prayed that it would work.
We poured the concrete mix, and then waited. That's the hardest part of the whole process. (besides carrying it, that is.) When we finally got to unmold it, we were pleased with what we found. Not so much detail with veins, but still, a nice shape and I'm pleased.

All done. We spread the concrete sealer over all 4 parts, and let it set. Aaron found his caulk gun, and time to install. The countertop pieces fit perfectly. Glued them down and got ready to get the back splash in. 160 pounds of crete was used, and it's approximately 6 feet long. I wished we could have convinced Eric to come back to help with this part.

All that is needed now, is the faucet back in place, the electrical fastened down, and all the seams caulked to keep water from leaking in between.

New window in the kitchen!
 It's been a while since I've been around, but wanted to tell you about the progress we've been making on our kitchen. It's been slow, but OH, so much fun! What wonders we have discovered.
First, I'll start with the window. The original window is 2 1/2 feet wide by 7 feet tall. BIG window in a kitchen. Also, the bottom half was covered by cabinets, keeping the kitchen pretty dark. Being that it is an original with to the house, it was a single pain, and very leaky, too. See where the trim stops? That's where the cabinets sat. A lot of wasted light, if you ask me.
 So we tore the cabinets out that were blocking the window (basically everything to the left of my stove. As we are digging them out, we found the floor had been built up at least an 1 1/2 inches. Many layers of linoleum flooring and the final being subfloor and a Pergo laminate. It is funny that instead of tearing it out, they would just layer on top. I suppose that is why ceilings were so high?
  We also found more layers of wallpaper. I counted 7 layers, each one on top of the old layer. Also, a hole in the floor where a sink or a toilet possible could have sat so many years ago.
 Finally, Aaron got the window out, the old trim wood, and had it stripped, right down to the brick. Now, time to get the new window in. After much cursing and holding the tounge just right, he and my oldest son, Matthew, got it fit in the hole. It didn't take much more to finish up the trim, and clean up the mess.

Wednesday, August 8, 2012
Kitchen sink and dishwasher

We finally got started on putting the sink in. This was a blank wall that we decided to use as the new sink and dishwasher location. First thing, tear off the plaster so Aaron can put plumbing and electrical in. New outlets for the dishwasher and disposal. Move the light switch for the existing light. We also needed to move the phone line.
I didn't get a picture of the wallpaper that had been collecting in the wall over the years, but there was some beautiful designs there. It would have been fun to see this house develop over the years. We were also confused why the lathe only goes up 1/2 way on the left hand side of the wall. It's been replaced by drywall. Our theory is that the original stairway to the 2nd floor was on the opposite side of that wall. The drywall starts about where there would have been a landing.

With all the new outlets in place, we were ready for the backer board. I know we should have used drywall, but plywood is what we had on hand so we could finish what we started. We cut the big hole out for the plumbing rather than trying to put the pipes through the plywood. Eventually, that square will be put back in.

Moving the cabinets and dishwasher into place. Things are starting to look real!
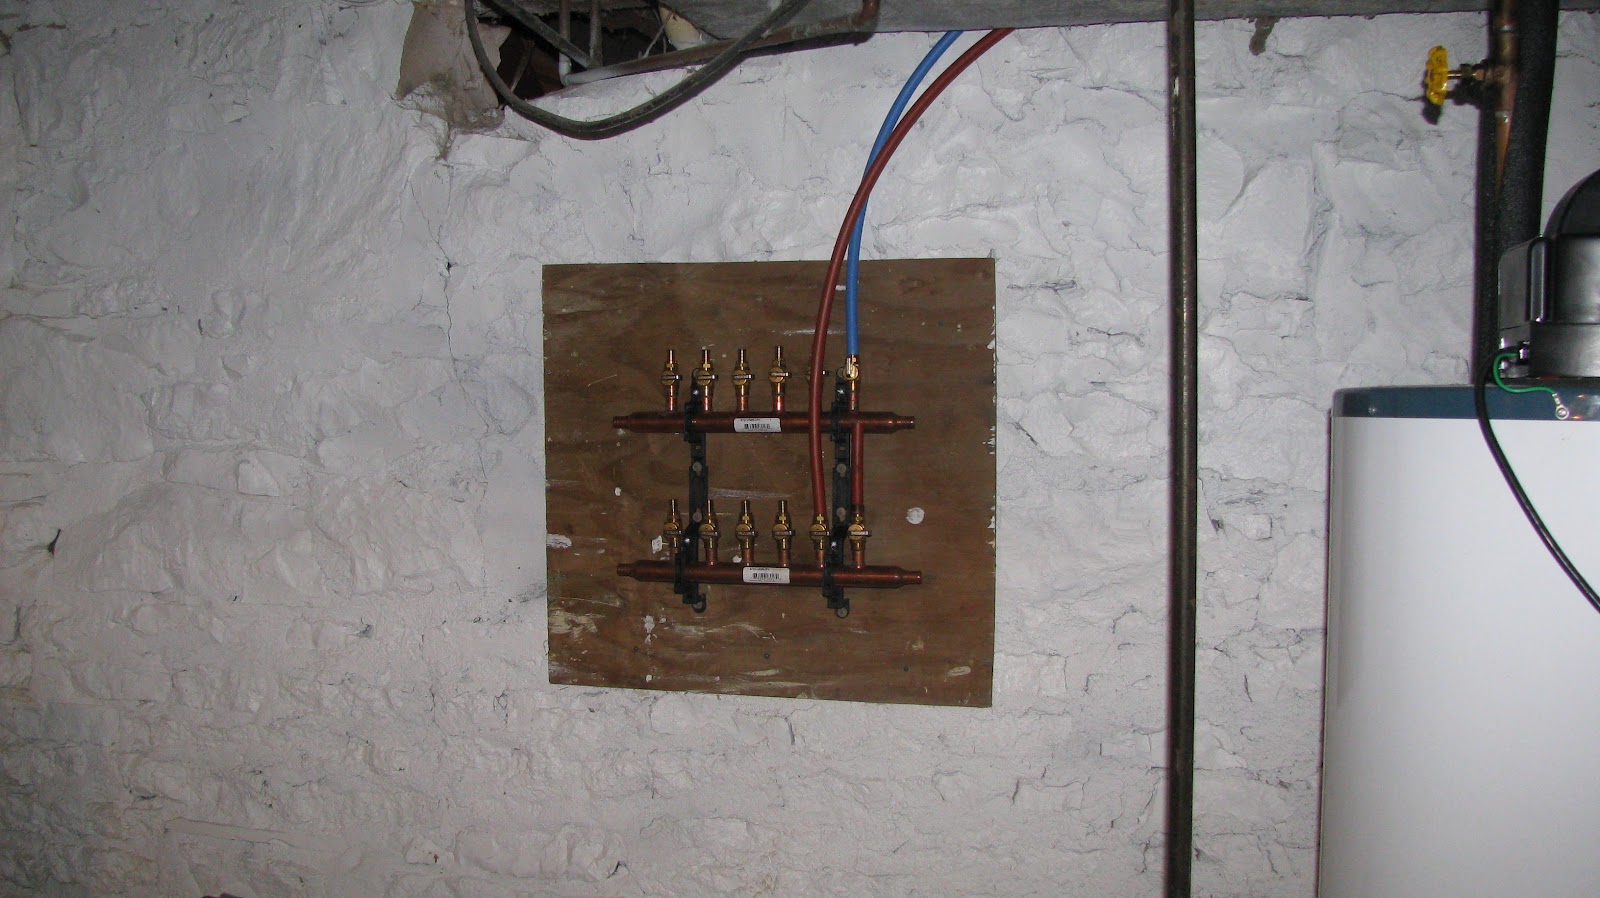
Aaron loves this kind of plumbing. I can't say that I blame him. No stinky PVC glue, or expensive copper to deal with. Soon, the whole house will be filled with the plastic tubing.

The faucet installed. Water connected, and it works! Next step is work on the countertops and backsplash. Concrete is purchased, and waiting to be mixed and poured. I'm getting really anxious to have this done! Really excited, though, to be this far. And it is before the tomatoes HAVE to be done. My canning pot is sitting there, getting ready.
Monday, July 2, 2012
Finding wallpaper
We're finaly getting some work done in the kitchen. We purchased an above range microwave to replace the old-timer one that came with the house. There had just a light and vent above the stove, so that meant we had to do a little bit of moving and sawing through the brick on the outside to move the vent up to accomodate the microwave. It also meant that we would need to start taking old cabinets down and putting new ones up.

A real pretty french wallpaper was hiding behind those cabinets. No, I don't think I would want it in my kitchen today, but I do like the green.
 Aaron started cutting the wall out for the new vent. Looks like a big hole, but it got all filled in.
 Look closely at the paper we found behind the stove. That was hiding behind the backsplash. YIKES! I can't imagine cooking in a kitchen that wild.
Now, to get the shelves in the boxes. Everything that was in the original cabinets is sitting in tubs on my dining room floor. Aaron has the next few days off from work, so hopefully we'll get that done. Hopefully we can get the plumbing done for the new dishwasher and sink, too, so I won't have to mop the floor after every load of dishes. :)

A real pretty french wallpaper was hiding behind those cabinets. No, I don't think I would want it in my kitchen today, but I do like the green.
 Aaron started cutting the wall out for the new vent. Looks like a big hole, but it got all filled in.
Fortunately, Aaron had the boxes built and an idea of how he wanted to hang the microwave. With some figiting, and holding on for dear life, we finally got it hung. The box on the right was just a bit bigger than we were thinking, so we had to take the next cupboard down.

Now, to get the shelves in the boxes. Everything that was in the original cabinets is sitting in tubs on my dining room floor. Aaron has the next few days off from work, so hopefully we'll get that done. Hopefully we can get the plumbing done for the new dishwasher and sink, too, so I won't have to mop the floor after every load of dishes. :)
Thursday, May 31, 2012
Kids in the summer
At our house, we have a lot of perennial gardens. They are filled with lilies, primrose, black eyed Susan's, purple cornflowers, and lots of other things that I haven't identified. What we're missing is a place to plant the kids' favorite flowers... the annual garden!
So, I took Sydney with me to flower shop. We picked out petunias (tuna flowers), marigolds, and pansies. All in shades of purple and orange. Now, where to plant them??
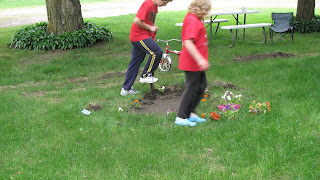 When the electricians came, we moved the park bench that was in the front of the house and the bricks that it was sitting on. This left a sunken dirt spot in the middle of the yard. Matthew spotted it, and said "why not here Mom?"
 It's a shady spot, but will work nicely for what they had planned. So, they went to work digging and stuffing. In the end, they ended up with a pretty garden. I can't wait until they flowers grow out and fill in the spaces. They are very proud of their little spot!
So, I took Sydney with me to flower shop. We picked out petunias (tuna flowers), marigolds, and pansies. All in shades of purple and orange. Now, where to plant them??


Subscribe to:
Posts (Atom)